
'Let's Go To The Movies' (Cinema4D Workshop)
- elijahetete

- Oct 3, 2019
- 3 min read

For this workshop I learnt the basic fundamentals of animating within Cinema4D and then post-process editing in Adobe After-effects. There was also a brief introduction on how to implement augmented reality features onto my work via an app called 'artivive'.


I first opened the base file titled ‘Car Scene_START’. The file was set up to copy a model which was already imported from another software. Becasue of this, not all the materials were imported, including saved views. Which meant that I had to re-assign them.
I accessed the ‘Render Settings’ from the toolbar to specify the above settings.
To add materials to the scene, I double clicked the material bar at the bottom. This then created a blank white material. I double clicked it again to open up the ‘Material Editor’. Adjust the setting as desired.


To add multiple materials to a single object I selected the object's polygons individually via 'polygon mode'. The button for this is located along the left hand side. Once in polygon mode I was able to see all the polygons individually, and assign different materials as required. Once this is done I made sure to go back to the model.
To set up a view for rendering I had to use a camera view. By clicking the camera icon on the toolbar I added a new scene.
From adding a camera view I then attempted to try and recreate the view that was initially shown.

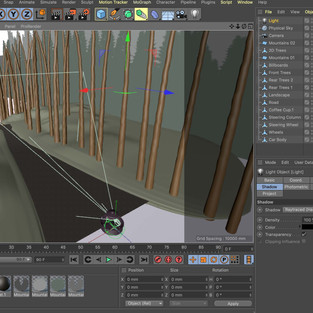


To light the scene, I added a ‘Physical Sky’. Click and hold the Floor icon, and select Physical Sky. and adjusted the shadows in the light properties.
To animate the scene the best way I first grouped the car parts and camera as one (ALT+G).
After I was then able to animate the group as a whole. To create movement, I then moved the time indicator down the timeline. Once the time indicator had been moved I could then move the car group.


Once I had finished adding key frames, I returned to my camera views and pressed ‘Render to Picture Viewer’. Once the rendering had been completed, I right clicked the folder of frames and clicked ‘Save As’, then change the Animation format to ‘MP4’.
I then Imported the render into Adobe After Effects. I made sure to set up a new composition with the same aspect ratio used for the render. Which in this case was 1000 x 1000 mega pixels.
I first added a circle and then some text over the image. The tools were located along the top. Each item would be able to add a layer in the lower panel. To immerse the selected objects within the scene, I changed the overlay mode to ‘soft light’.

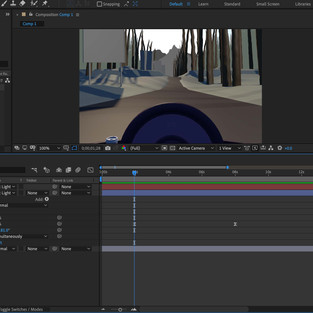


I then had to animate the circle to reveal itself within the scene. After adjusting the offset to choose a start point for the circle's reveal I then set the start and end to 0%. Once the clip was ready to export, I clicked 'File - Export - Add to Adobe Media Encoder Queue.' This sent the file to the 'Adobe Media Encoder' where I was able to render the animation. I clicked the preset link and then changed the preset option to match the source settings. To ensure the aspect ratio remained the same for the rendered output.
Click the video above.

When logged in to Artivive, I typed my project name and clicked ‘Add Artwork’. A page then came up which then prompted me to upload a reference image thumbnail to activate the augmentation effect of a video playing once the augmentation has been initiated. The two files had to be a similar aspect ratio to ensure a seamless overlay.


Comments